User Management – Permission Sets
Overview
In Dalfin, User Roles determine what actions a user can perform within the system. Each role is assigned a set of permissions that define access to modules, windows, records, and processes.
When a new system is generated, two default roles are automatically created:
- Organization Owner – Full control over the organization and system configuration.
- System Admin – Manages users, system settings, and operational configurations.
As a user with system configuration privileges, you can manage permission sets, including roles and access permissions.
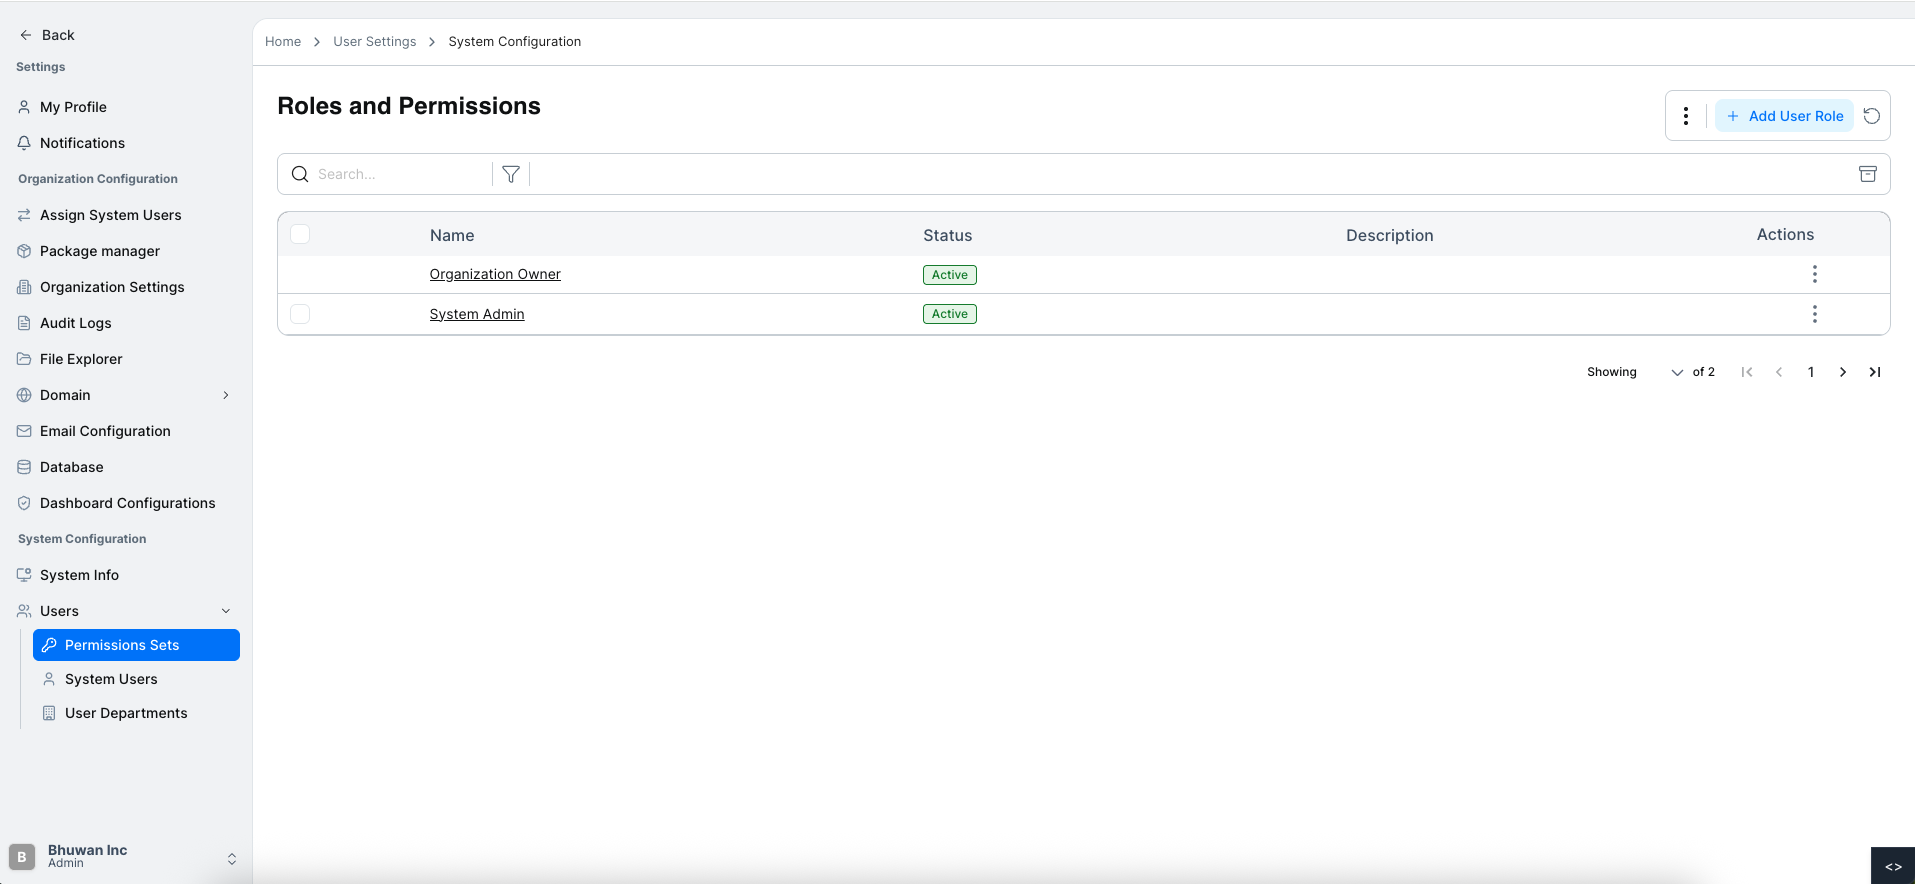
Viewing Permission Sets
When logged in as a user with system configuration privileges on the Permission Sets Management page under User Management:
- View a list of all existing permission sets.
- Each set displays its role name and status (Active or Inactive).
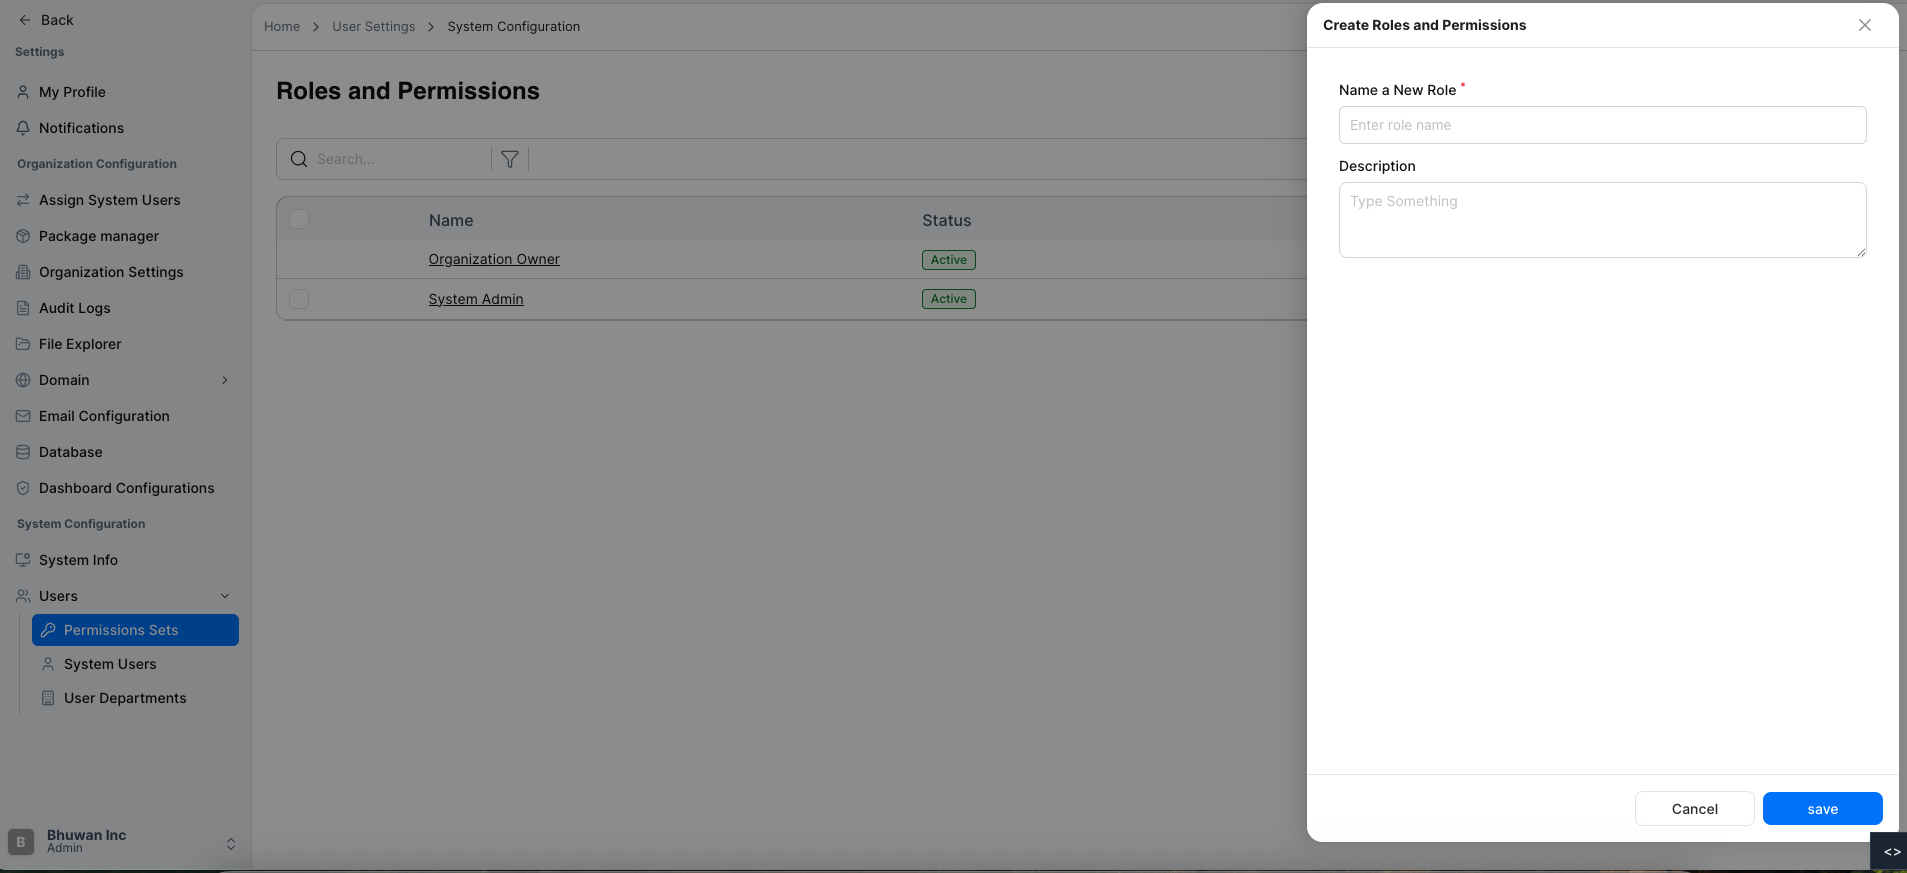
Adding a New User Role
You can create a new User Role to define its access permissions within the system.
Steps to Add a Permission Set
Open Permission Sets
Navigate to Permission Sets.
Click Add User Role
Click the Add User Role button above the permission sets table.
Enter Role Information
Fill in the required details:
- Role Name – Name of the permission set.
- Description – Brief description of the role’s purpose and responsibilities.
Save the Permission Set
Click Save.
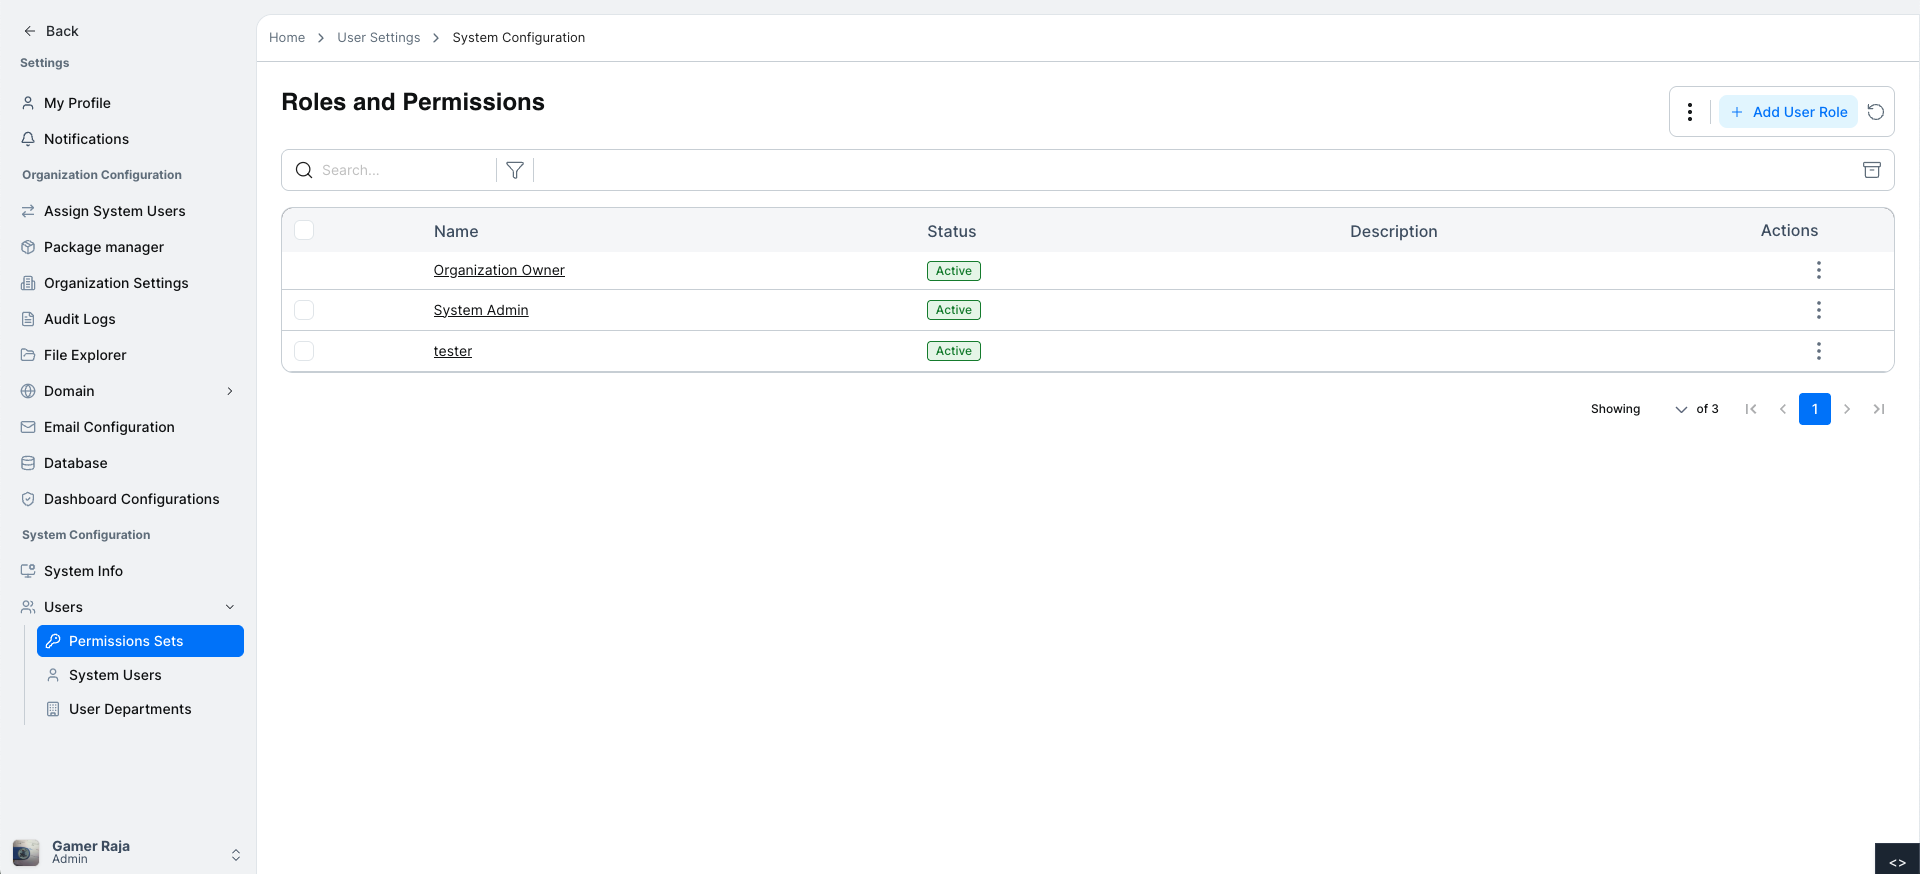
Permission Set Created
The new user role will be added to the user role list.
Confirmation Message
A confirmation message will appear indicating the user role has been successfully added.
Configuring Permissions for a User Role
After creating a user role, administrators can configure permissions to control system access.
Steps to Configure Role Permissions
1. Open Permission Sets
Navigate to Permission Sets under Users.
2. Select a User Role
Click the role name to open the Permissions panel.
Examples: Organization Owner, System Admin, Tester
3. Choose Permission Category
Permissions are organized into the following categories:
- Table Level
- Window Level
- Record Level
- Process Orchestrator
- View Action
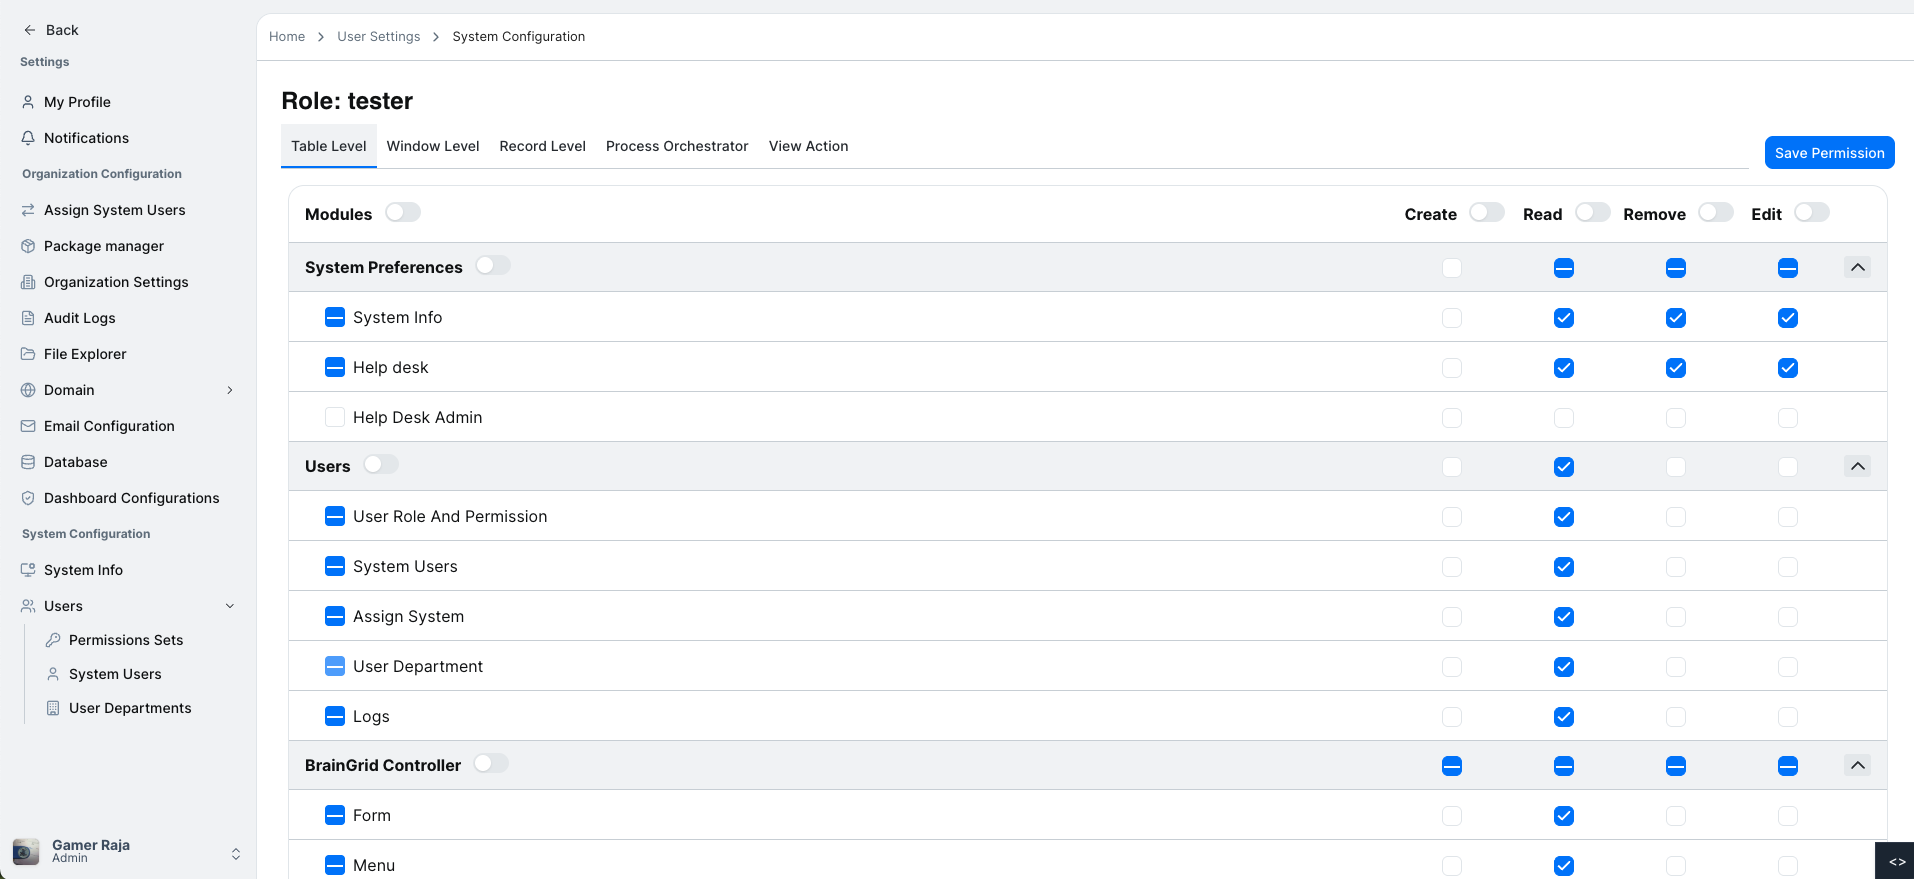
Configure Table Level Permissions
Table-level permissions control access to major modules:
- System Preferences
- Users
- BrainGrid Controller
- Additional Services
Within each module, enable permissions such as:
- Create
- Read
- Remove
- Edit
Configure Window Level Permissions
Window-level permissions allow control over specific windows or UI modules.
Select the required windows and enable appropriate access permissions.
Configure Record Level Permissions
Record-level permissions control access to specific system records.
Example: Bug Management
Configure Process Orchestrator Permissions
The Process Orchestrator allows fine-grained control over automated workflows. You can manage processes, filters, modules, and record-level access for each role.
-
Open Process Orchestrator:
Navigate to the Process Orchestrator tab. -
Search for a Process:
Use the search bar to locate processes by name. -
Apply Filters:
Filters help narrow down available processes. Available filter types include:- Button
- API
- Schedule
- Event

Selecting a filter updates the list of available processes.
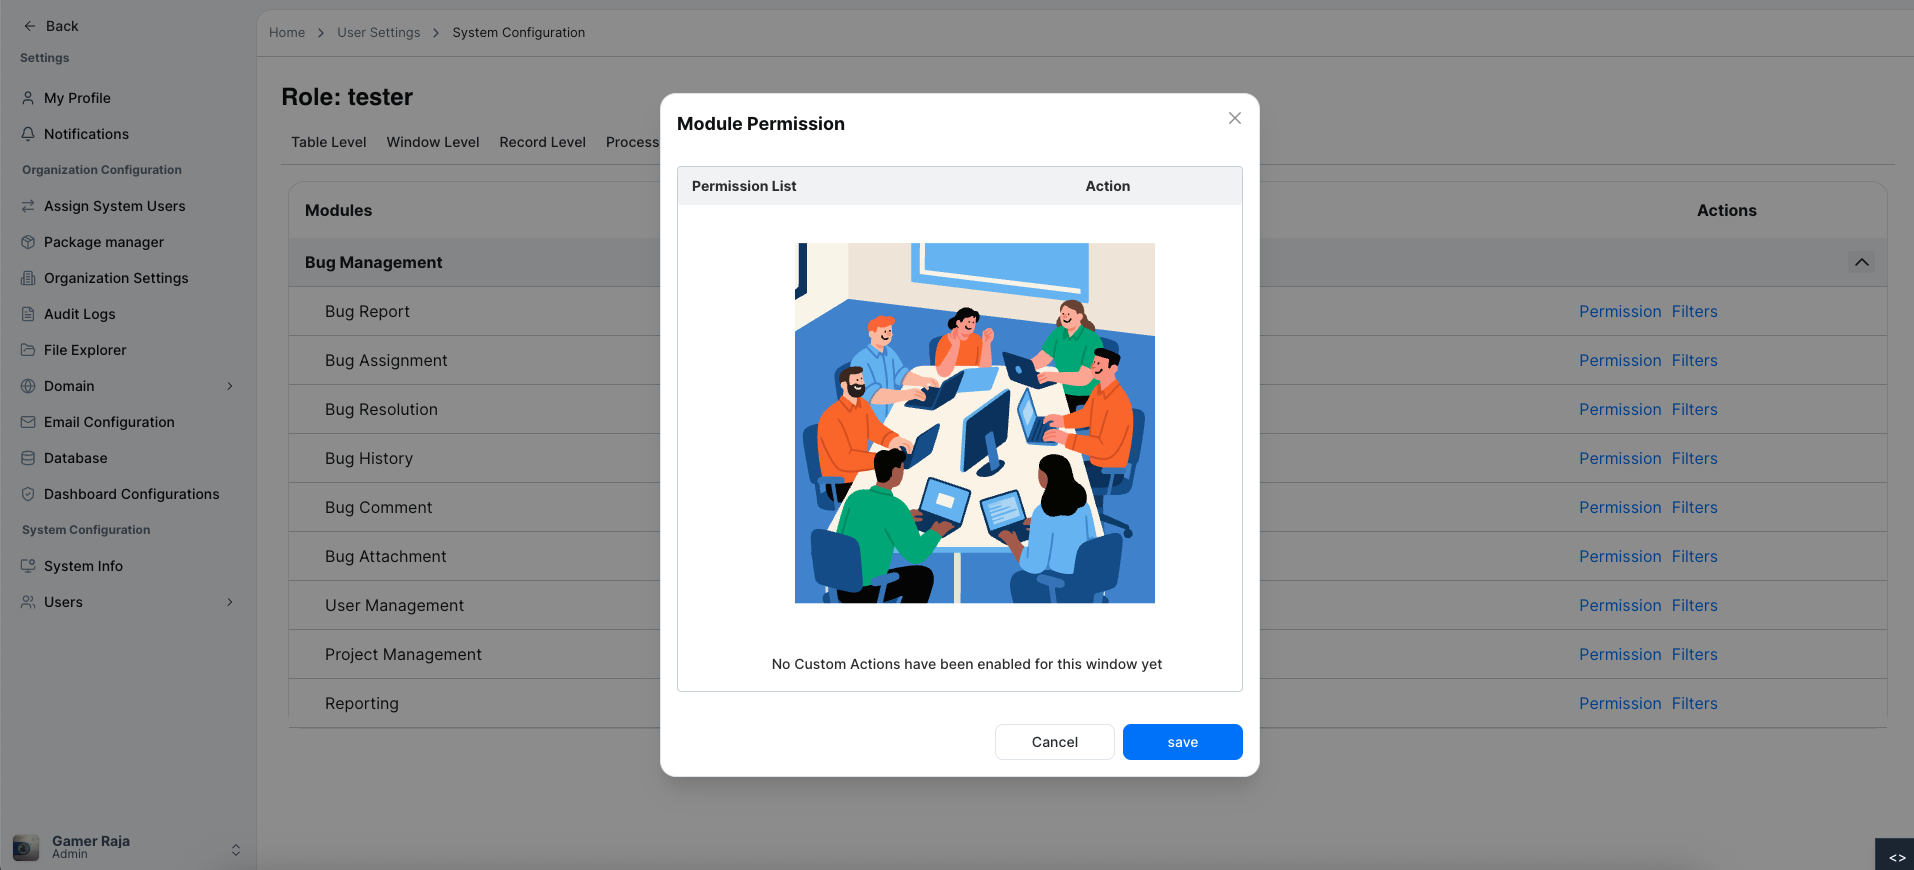
View Modules and Actions
Click a process to open the Module Permissions List modal.
- Permission List shows available modules/processes
- Action column shows assignable operations
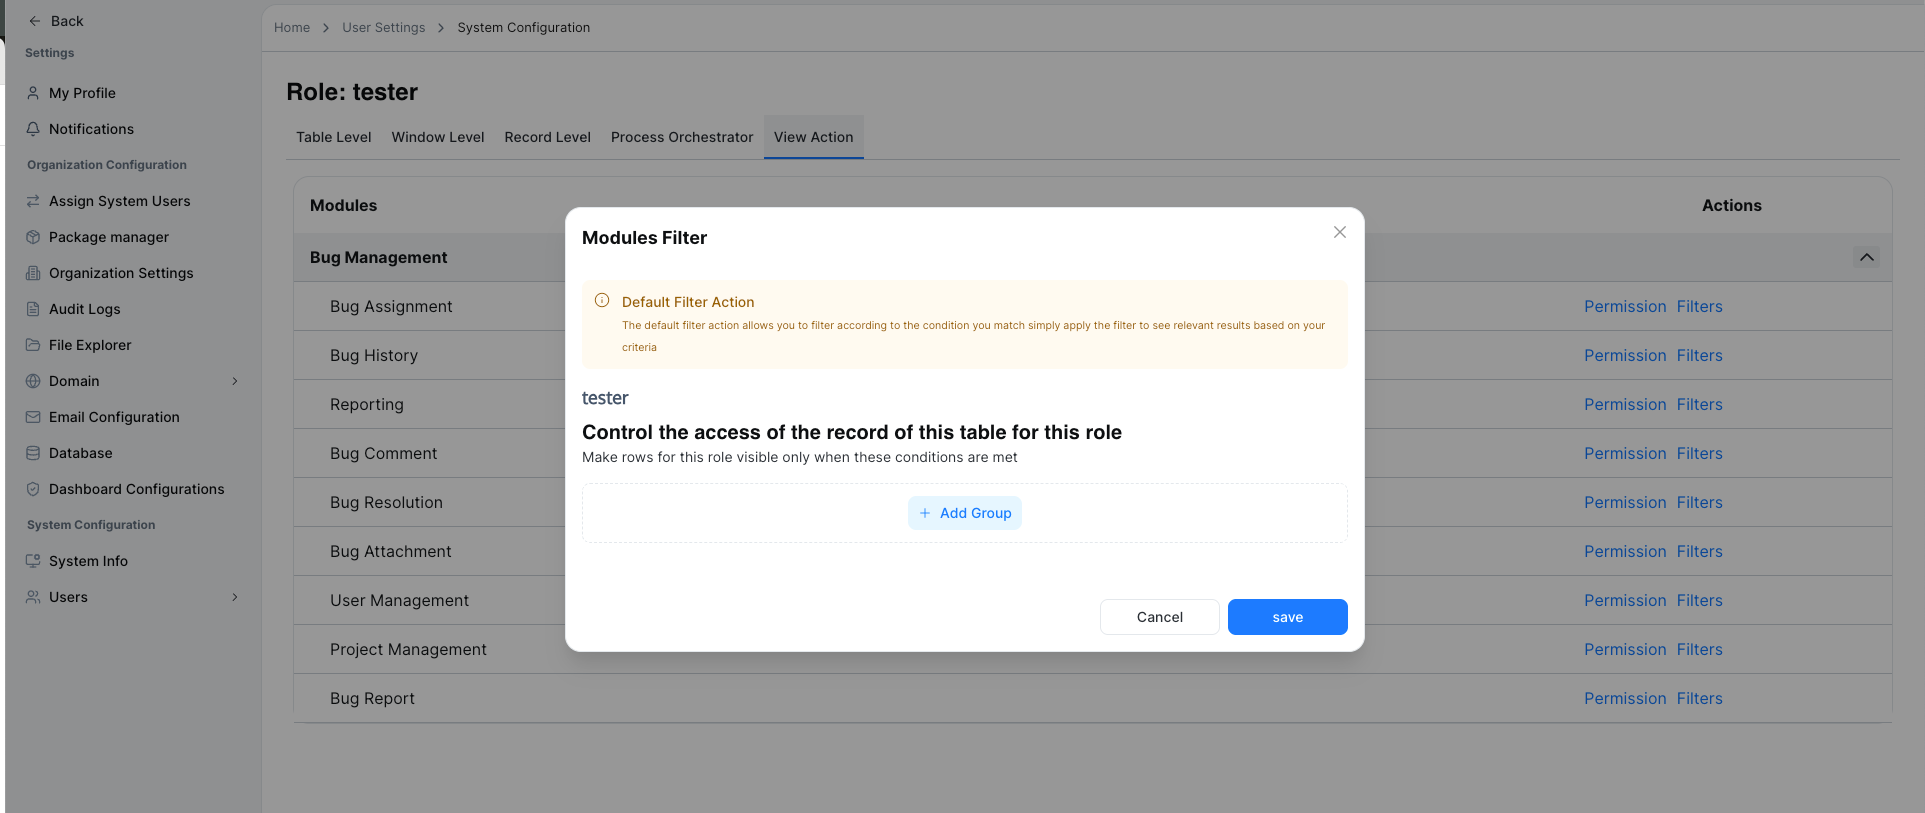
Configure Filter Modules
Click Filter Modules to manage filters:
- Click Add Group to create new filter conditions.
- Default filter actions for Tester role are provided.
- Click Save to apply group filters.
4. Save Permissions
Click Save after configuring all permissions and filters.
Process Orchestrator permissions allow administrators to control access at multiple levels:
- Module actions
- Process filters
- Record-level visibility
- Process orchestrator execution permissions
Ensuring precise access control for all automated process in Dalfin.
Viewing Details of a User Role
View detailed information from the Actions menu in the permission sets table.
Steps to View Permission Set Details
Open Permission Sets
Navigate to Permission Sets.
Open the Actions Menu
Locate the permission set and click the Actions menu icon.
Select View
Click View from the dropdown.
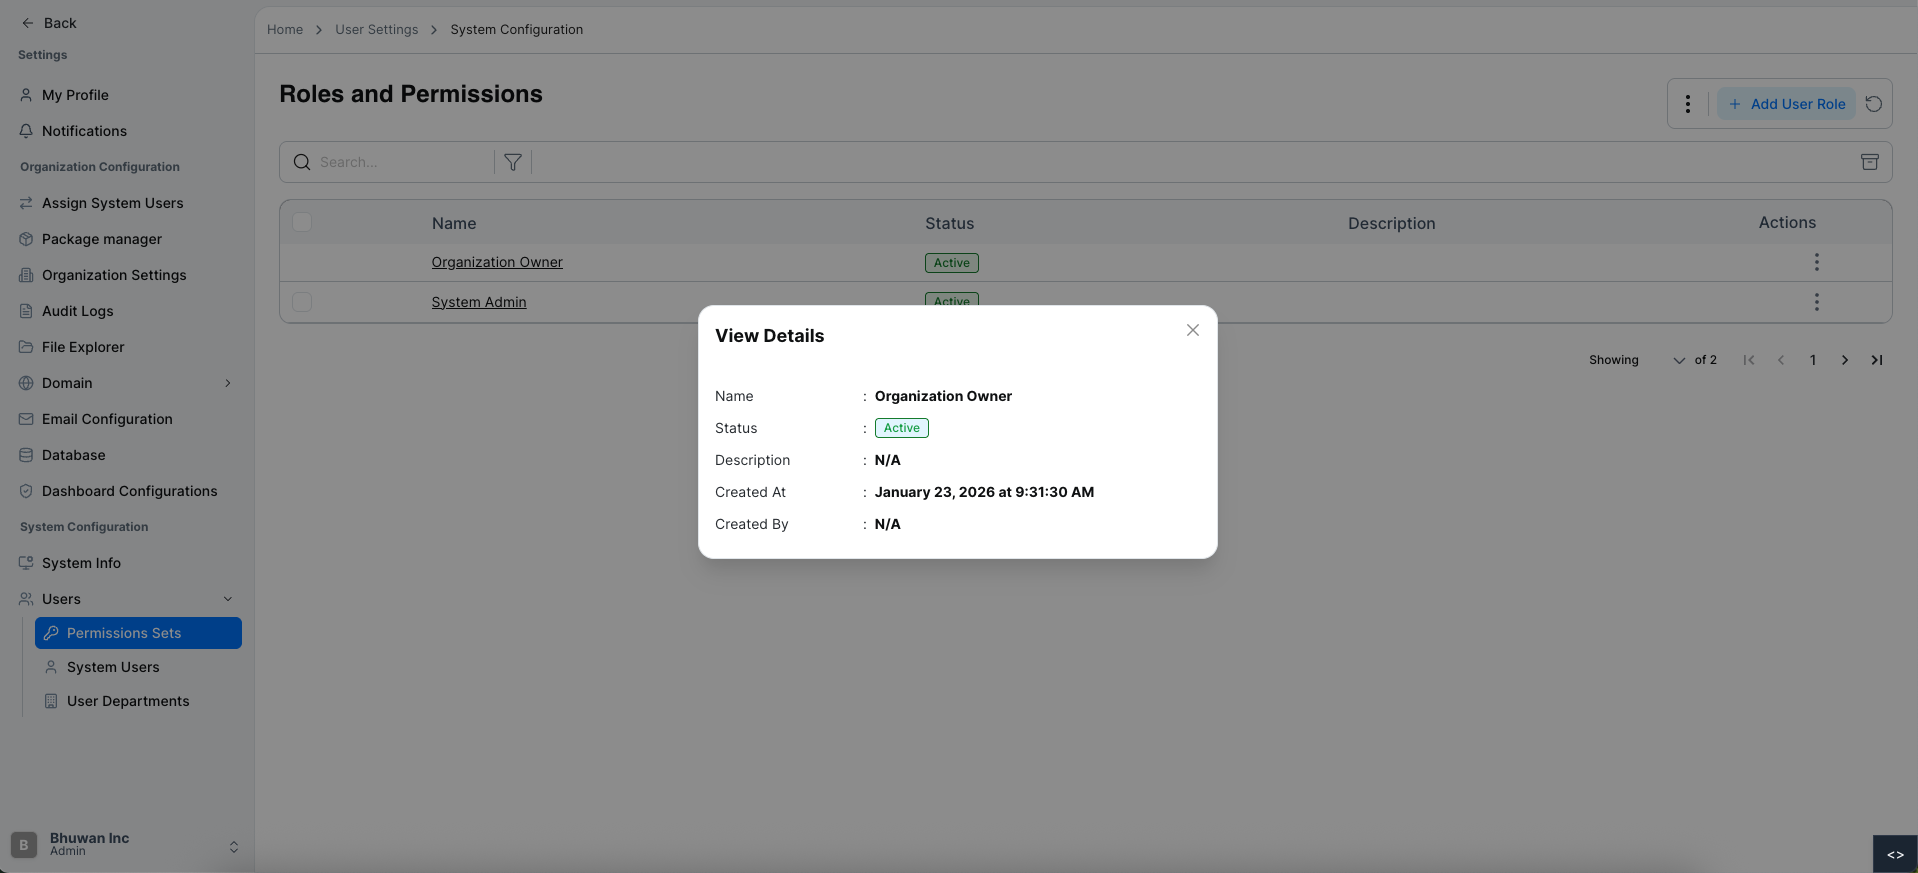
Review Permission Set Details
A details panel will show:
- Role Name
- Status
- Description
- Created At
- Created By
Refreshing the Permission Sets List
To reload the latest data:
- Click the Refresh icon near the Add User Role button.
The list updates to display the users role.
Exporting Permission Sets
You can export the permission sets list for reporting or external use.
Export to CSV
- Click the menu icon next to Add User Role.
- Select Export to CSV.
- The system downloads the users role list as a CSV file.
Searching for a System User
Quickly locate a specific user using the search feature.
Open Permission Sets
Navigate to Permission Sets.
Enter Search Term
Type the user name or email in the search bar.
View Results
Matching users appear in the list.
Filtering Permission Sets
Filter user roles based on status.
Available filter options:
- Active
- Inactive
Open Permission Sets
Navigate to Permission Sets.
Click Filter Icon
Click the Filter icon above the table.
Select Status
A filter form will appear.
Choose the desired Status from the dropdown:
- Active
- Inactive
Apply Filter
The table displays users role matching the selected filter.
Archiving All User Roles
Archive users without deleting their data using the Archive icon.
Open Permission Sets
Navigate to Permission Sets.
Click Archive Icon
Click the Archive icon near filter and action buttons.
Archive Complete
All system users are archived.
For additional assistance or detailed instructions, refer to the help section or contact support.